

There’s something irresistibly cozy about a Biscoff Cheesecake Recipe that brings buttery, spiced cookie goodness into a creamy, dreamy dessert. I absolutely love how the delicate crunch of Biscoff cookies creates a perfect crust, while the Biscoff spread infused filling just melts in your mouth. You’ll find that this cheesecake feels like a warm hug in every bite.

Why You’ll Love This Recipe
- Rich Biscoff Flavor: The Biscoff cookies and spread combine to give a unique spiced caramel taste that’s addictive.
- Creamy, No-Bake Filling: It’s super easy to whip up but results in a luxuriously smooth texture that holds beautifully once chilled.
- Make-Ahead Friendly: This cheesecake improves with time, making it perfect for prepping a day in advance for guests or celebrations.
- Impressive Yet Simple: It looks fancy but really comes together with straightforward steps and just a few ingredients.
Ingredients You’ll Need
Each ingredient in this Biscoff Cheesecake Recipe plays an important role, from creating the crisp, buttery crust to the luscious filling that’s bursting with Biscoff flavor. Look for good quality cream cheese and smooth Biscoff spread to get the best results.

- Biscoff cookies: Crush them finely for the perfect crunchy crust base.
- Butter: Melted butter binds the crust ingredients together and adds richness.
- Cream cheese: Make sure it’s softened to room temperature for a smooth mix.
- Superfine sugar: Dissolves easily to create a silky filling without graininess.
- Biscoff spread: The star ingredient—use smooth and creamy for easy mixing.
- Heavy cream: Adds lightness and fluffiness when whipped into the filling.
- For frosting and garnish: Extra melted Biscoff spread and crushed cookies add that signature finishing touch.
Variations
I love how flexible this Biscoff Cheesecake Recipe is. Over time, I’ve played with adding my own twists to suit different occasions or dietary needs, and you should totally feel free to do the same!
- Dairy-Free Option: I’ve swapped in vegan butter, dairy-free cream cheese, and coconut cream, and it turned out surprisingly rich and delicious.
- Chocolate Swirl Addition: Adding melted dark chocolate swirled into the filling gives a lovely contrast that my family goes crazy for.
- Nutty Crunch: Sprinkle chopped toasted pecans or walnuts on top for an extra layer of texture and flavor.
- Mini Cheesecakes: I occasionally make individual portions in jars for easy gifting and portion control—super cute and festive!
How to Make Biscoff Cheesecake Recipe

Step 1: Prepare the Crust with Care
Start by lining an 8-inch springform pan with parchment paper—this step is a lifesaver for easy release later on. Crush your Biscoff cookies finely (I use a food processor), then mix with melted butter until everything is well combined. Press this crumbly mixture evenly into the bottom of your pan and pop it in the fridge while you mix the filling. Chilling the crust helps it set up nicely and hold its shape under the filling.
Step 2: Whip the Cream Cheese Filling to Dreamy Perfection
This is the fun part where everything comes together. Beat the softened cream cheese with superfine sugar until it’s smooth and fluffy—this usually takes about two minutes with a hand mixer or stand mixer. Next, fold in the luscious Biscoff spread until fully mixed, then slowly add the heavy cream. Keep beating until the mixture thickens and holds soft peaks—this step is key to getting that light, melt-in-your-mouth texture. I always scrape down the bowl sides to avoid lumps.
Step 3: Assemble and Chill
Use a rubber spatula to gently spread the filling over your chilled crust, smoothing the top evenly. Cover the cheesecake and refrigerate it overnight, or at least for six hours, so it firms up perfectly. Patience here really pays off—the longer it chills, the better it sets and slices.
Step 4: Frost and Garnish Like a Pro
Once your cheesecake is firm, melt some extra Biscoff spread and drizzle it evenly over the top, spreading it carefully to cover all edges. Then sprinkle crushed Biscoff cookies around the sides for that extra crunch and pretty finish. Chill for another 30 minutes to let the topping set, and you’re ready to indulge!
Pro Tips for Making Biscoff Cheesecake Recipe
- Soften Ingredients First: Softening your cream cheese and whipping cream at room temperature helps avoid lumps and creates a silky filling every time.
- Use Parchment Paper Wisely: Don’t skip lining the pan; it makes removing the cheesecake a breeze and keeps your edges neat.
- Crust Compression: Press the cookie crust firmly with the bottom of a flat glass or measuring cup to ensure a compact base that won’t crumble apart.
- Avoid Overbeating Cream: Whip the heavy cream just until thickened but not too stiff, or the filling can become grainy or split.
How to Serve Biscoff Cheesecake Recipe

Garnishes
When I serve this cheesecake, I love topping it with a few extra crushed Biscoff cookies for texture, and sometimes a small dollop of whipped cream on each slice for an elegant touch. A light dusting of cinnamon can also add warmth and a hint of spice that complements the Biscoff beautifully.
Side Dishes
Pair your Biscoff cheesecake with fresh berries like raspberries or strawberries to cut through the richness, or a hot cup of coffee or chai tea for a cozy, comforting combo. I’ve even served it alongside salted caramel sauce for extra indulgence—trust me, it’s amazing.
Creative Ways to Present
For special occasions, I’ve decorated this cheesecake with edible flowers or drizzles of chocolate ganache for a luxurious look. You can also make mini Biscoff cheesecakes in individual containers or jars—perfect for parties or gifting. A layered parfait with crushed cookies, cheesecake filling, and whipped cream is another crowd-pleaser I’ve enjoyed making.
Make Ahead and Storage
Storing Leftovers
Leftover Biscoff cheesecake keeps wonderfully in the fridge for up to two weeks when covered tightly with plastic wrap or stored in an airtight container. I’ve found that storing it on a lower shelf where it’s coldest helps maintain its texture best.
Freezing
Freezing this cheesecake is totally doable and great for making ahead. I freeze it in a shallow, airtight container and it keeps well for up to six months. Just be sure to let it thaw in the fridge overnight before serving to preserve that creamy texture.
Reheating
This cheesecake is best served chilled, so generally I don’t recommend reheating. However, if you want to warm a slice just a bit, leaving it at room temperature for 15-20 minutes brings out the Biscoff aroma and softens the slice without melting it.
FAQs
-
Can I use regular sugar instead of superfine sugar in the Biscoff Cheesecake Recipe?
Yes, you can use regular granulated sugar, but superfine sugar dissolves better, giving a smoother texture without any graininess. If you only have granulated sugar, consider pulsing it in a food processor briefly to make it finer.
-
Do I need to bake the Biscoff cheesecake?
Nope! This Biscoff Cheesecake Recipe is a no-bake dessert. Chilling overnight allows the filling to set perfectly without compromising its creamy texture.
-
Can I substitute Biscoff spread with peanut butter or Nutella?
While the flavor will change, swapping in peanut butter or Nutella is an option—just note that the signature Biscoff spiced caramel notes will be missing. You might also need to adjust sweetness or thickness depending on the substitute.
-
How do I prevent cracks on the cheesecake surface?
Since this cheesecake is no-bake, cracking is rare, but to avoid any texture inconsistencies, be sure not to overbeat the filling and chill it gently. Using room temperature ingredients also helps with a smooth surface.
Final Thoughts
I can’t recommend this Biscoff Cheesecake Recipe enough—it’s the perfect blend of simple prep and indulgent flavor that always impresses whether for a special occasion or a cozy weekend treat. Once you try it, you’ll see why I keep coming back to this recipe when I want something that tastes luxe but feels easy. Give it a go and enjoy every creamy, caramel-spiced bite!
Print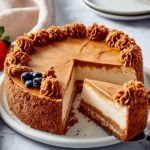
Biscoff Cheesecake Recipe
- Prep Time: 15 minutes
- Cook Time: 2 hours 10 minutes
- Total Time: 2 hours 25 minutes
- Yield: 12 servings 1x
- Category: Dessert
- Method: No-Cook
- Cuisine: American
Description
This luscious Biscoff Cheesecake combines the spicy sweetness of Biscoff cookies and spread with creamy cream cheese and heavy cream. Featuring a crunchy Biscoff crust and a smooth, fluffy filling, it’s a decadent dessert perfect for special occasions or treat-yourself moments. The no-bake recipe requires chilling time to set, making it easy to prepare ahead.
Ingredients
For the crust:
- 9 ounces Biscoff cookies crushed
- 6 tablespoons butter
For the filling:
- 2 1/2 cups cream cheese softened
- 1/4 cup superfine sugar
- 1 cup Biscoff spread smooth
- 1 1/4 cups heavy cream
For the frosting:
- 1/2 cup Biscoff spread melted
- 1/4 cup Biscoff cookies crushed
Instructions
- Prepare the crust: Line an 8-inch springform cake pan with parchment paper. In a mixing bowl, combine the crushed Biscoff cookies with melted butter until evenly mixed. Press the mixture firmly into the bottom of the lined pan to form a crust. Refrigerate while preparing the filling.
- Make the filling: In a large mixing bowl or the bowl of a stand mixer fitted with a paddle attachment, beat the softened cream cheese together with superfine sugar until smooth and fluffy, about two minutes. Add the Biscoff spread and continue beating until fully combined.
- Add heavy cream: Pour in the heavy cream and beat the mixture until it thickens and stabilizes, about two minutes more, creating a light and airy filling.
- Assemble the cheesecake: Use a rubber spatula to spread the filling evenly over the chilled crust in the springform pan. Cover and refrigerate the cheesecake overnight or for at least 6 hours to allow it to set firmly.
- Add the frosting and garnish: Once the cheesecake is set, melt the Biscoff spread until pourable. Pour it evenly over the top of the cheesecake and use a rubber spatula to spread it to cover the edges. Sprinkle the sides with the remaining crushed Biscoff cookies. Return to the refrigerator for at least 30 minutes to let the topping firm.
Notes
- For a dairy-free version, substitute vegan butter, vegan cream cheese, and vegan double cream.
- Always store your Biscoff cheesecake covered in the refrigerator; it will keep well for up to 2 weeks.
- To freeze, place the cheesecake in a shallow airtight container and freeze for up to 6 months.
Nutrition
- Serving Size: 1 slice
- Calories: 420 kcal
- Sugar: 28 g
- Sodium: 210 mg
- Fat: 32 g
- Saturated Fat: 18 g
- Unsaturated Fat: 12 g
- Trans Fat: 0 g
- Carbohydrates: 28 g
- Fiber: 1 g
- Protein: 5 g
- Cholesterol: 110 mg


