

There’s something utterly captivating about a perfectly crispy, golden onion that blooms into a stunning flower right before your eyes. This Blooming Onion Recipe is not just eye candy; it’s a crowd-pleaser with crispy, flavorful petals that make for an unforgettable appetizer or snack whenever you want to impress.

Why You’ll Love This Recipe
- Show-Stopping Presentation: It transforms a humble onion into a beautiful bloom that wows at any table.
- Deliciously Crispy Texture: The coating fries up perfectly crisp while the onion stays tender inside.
- Flavor-Packed Seasoning: The blend of spices delivers layers of smoky, savory, and mildly spicy notes.
- Fun and Interactive to Make: I love how slicing and flouring feels like an art project—you’ll enjoy the process as much as the result.
Ingredients You’ll Need
Each ingredient plays a key role in making this blooming onion irresistible—from the sharp fresh onion itself to the perfectly balanced seasoning in the flour mix. Here’s a quick rundown before we dive into the how-to.

- High-heat oil: Canola, corn, or peanut oil works best for deep-frying because they handle high temperatures without burning.
- Large sweet onion (like Vidalia): A sweet variety balances out the frying, giving sweetness and crunch all at once.
- All-purpose flour: This is the base for the crispy coating—be sure it’s fresh for best texture.
- Paprika: Adds mild smoky warmth and beautiful color to the breading.
- Kosher salt: Divided into the mix and sprinkling, it seasons every layer evenly.
- Dried oregano: Provides an herbal note that brightens the spice blend.
- Cayenne pepper: Just a touch to add a subtle kick without overpowering.
- Ground cumin: Brings earthy warmth that pairs beautifully with the paprika.
- Garlic powder: For that familiar savory punch.
- Freshly ground black pepper: Freshly cracked delivers better aroma and flavor.
- Eggs: Bind the coating to the onion and help the flour stick perfectly.
- Buttermilk or whole/2% milk: Makes the batter moist and tenderizes the onion slightly.
- Dipping sauce (optional): Your favorite sauce adds the final flourish—ranch or chipotle mayo are great choices.
Variations
I love experimenting with this blooming onion recipe, and you can easily tweak it to suit your taste or dietary needs. Don’t hesitate to get creative!
- Spice it up: I added smoked paprika and a little chipotle powder once for a deeper smoky flavor that my spice-loving family went wild over.
- Gluten-free version: Swap all-purpose flour for gluten-free flour blend, and it still fries up crisply—just watch the coating as it can brown quicker.
- Vegan adaptation: I tried using aquafaba and plant-based milk for the egg and buttermilk; it worked surprisingly well with slightly lighter texture.
- Different onions: Occasionally, I’ve used sweet white onions or even small red onions; the sweetness changes slightly, which can be a nice twist.
How to Make Blooming Onion Recipe

Step 1: Prepare Your Oil and Breading Seasoning
Start by heating your high-heat oil in a large stockpot until it reaches around 375ºF. I always use a deep-frying thermometer here—it’s the best way to keep your oil at the perfect temperature and avoid soggy results. While the oil heats, whisk together the flour and spices for your breading. I recommend setting aside a small portion of this mixture; it’ll help with coating the onion petals evenly in the later steps.
Step 2: Slice Your Onion into a Stunning Bloom
This is the part I find the most fun—and where most of the ‘bloom’ magic happens. Place your peeled onion root-side up and carefully make vertical cuts about half an inch apart, starting just below the root to keep it intact. You’ll make a total of 16 cuts, creating 16 “petals.” Don’t rush this step! Using a sharp chef’s knife and making deliberate cuts prevents tearing. Once cut, flip the onion over and gently pull the petals apart to open it like a flower. If some petals are sticking at the base, a delicate slice with your knife tip frees them so every petal cooks evenly.
Step 3: Flour, Dip, and Flour Again
Now comes the layering to get that crispy crunch. First, place your onion cut-side up in the flour mixture, dusting all petals. Then transfer the onion cut-side down into the egg and buttermilk mix, spreading the petals carefully so each one gets coated. The egg wash helps the flour adhere better. Finally, dip the onion back into the flour mixture cut-side up again, sprinkling the reserved flour onto each petal section by section for maximum coverage and crunch. This double coating trick is something I picked up after a few attempts—the difference is incredible.
Step 4: Fry Until Golden and Tender
With your oil hot and ready, gently lower the onion cut-side up into the oil—it will bubble quite a bit, so be careful! I use a spider strainer for this maneuver to keep a good grip. Keep your oil temperature between 360 and 365ºF; you’ll likely have to adjust the heat. Fry the onion for about 4 minutes on one side until deep golden brown, then flip and fry another 3 to 4 minutes until the onion is knife tender all over. The blooming onion is ready when your knife slides easily through the petals but everything remains super crispy outside. You’ll smell that inviting aroma—the moment I always look forward to.
Step 5: Drain and Season
Once fried, remove the onion from the oil cut-side down and let any excess oil drip back into the pot. Transfer it to a wire rack over paper towels to stay crisp while draining. Sprinkle with the last bit of kosher salt while still hot—this finishing touch amps up the flavor beautifully. Let it rest about 5 minutes before serving so it cools slightly and keeps its crunch. Pair it with a creamy dipping sauce, like ranch or spicy mayo, for a perfect contrast.
Pro Tips for Making Blooming Onion Recipe
- Use a Sharp Knife: A sharp chef’s knife keeps your onion petals clean and intact, avoiding tears that cause uneven cooking.
- Double Flour Coating: Reserving some flour and dusting petals twice boosts crunchiness and helps seasoning stick better.
- Temperature Management: Monitor oil temperature with a thermometer to keep the lotus crisp and avoid heavy, oily coating.
- Don’t Forget the Root: Keeping the root intact holds the petals together, so your onion blooms beautifully and holds shape during frying.
How to Serve Blooming Onion Recipe

Garnishes
I like to finish off the blooming onion with a sprinkling of flaky sea salt for extra crunch and a squeeze of fresh lemon juice to brighten up the richness. Fresh chopped parsley or chives add a lovely pop of color, too. These simple touches really make a difference and bring the whole plate together.
Side Dishes
For sides, I often go with classic crowd-pleasers like coleslaw, a vibrant green salad, or even some roasted sweet potato wedges. These provide a refreshing counterbalance to the fried onion and keep the meal light yet satisfying.
Creative Ways to Present
Serving this blooming onion on a wooden board surrounded by some colorful dipping bowls turns it into a real centerpiece. For parties, I’ve stuffed the petals with cheese or bacon bits before frying—your guests love the surprise. You can also arrange it on individual plates with drizzles of spicy aioli for an elegant appetizer vibe.
Make Ahead and Storage
Storing Leftovers
My family rarely has leftovers, but when we do, I let the blooming onion cool completely and store it in an airtight container in the fridge for up to 1 day. To keep the crunch, I place a paper towel inside the container to absorb any moisture.
Freezing
I haven’t recommended freezing blooming onion because the texture doesn’t hold up well after thawing. The crispy coating usually loses its crunch, so I prefer making it fresh for best results.
Reheating
To reheat leftovers, I place the onion on a wire rack in a 375ºF oven for 8–10 minutes—this revives some of the crispness without drying out the onion. Avoid microwaving, as it makes the coating soggy.
FAQs
-
Can I use onions other than sweet onions for this Blooming Onion Recipe?
Absolutely! While sweet onions like Vidalia are preferred because of their milder taste and natural sweetness, you can use yellow or white onions. Just keep in mind that sharper onions may have a stronger bite, so adjusting your seasoning or soaking the onion briefly in cold water before slicing can help mellow the flavor.
-
How can I tell when the blooming onion is cooked perfectly?
You’ll want the outside to be a deep golden brown and crispy, while the onion inside should be tender enough that a knife slides through easily without resistance. Keeping an eye on the oil temperature and frying the onion evenly on both sides ensures that balance.
-
What’s a good dipping sauce to serve with the Blooming Onion Recipe?
Classic ranch dressing is a favorite, but you can’t go wrong with spicy mayo, garlic aioli, or even a zesty horseradish sauce. I often jazz mine up with a pinch of cayenne for some heat that complements the seasoning.
-
Is there a way to make this recipe healthier?
While this recipe is all about deep frying, baking is an option if you want less oil. You can spray the coated onion with cooking spray and bake at 425ºF, flipping once, until golden and crisp. The texture won’t be quite the same, but it’s a good alternative.
-
How do I avoid the petals falling apart while frying?
Keeping the root intact during slicing holds the petals together. Also, handling the onion gently when dipping and frying prevents breakage. Using a spider strainer to lower and flip helps maintain the bloom shape perfectly during frying.
Final Thoughts
This Blooming Onion Recipe has become one of those dishes I pull out when I want to impress friends or just treat my family to something a little special. The satisfying crunch, the beautiful presentation, and the addictive savory flavor make it a winner every time. I hope you enjoy making it as much as I do—and trust me, once you master it, you’ll have a fantastic party trick and snack ready to share anytime!
Print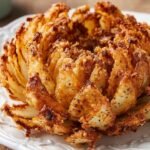
Blooming Onion Recipe
- Prep Time: 20 minutes
- Cook Time: 8 minutes
- Total Time: 28 minutes
- Yield: 6 servings 1x
- Category: Appetizer
- Method: Frying
- Cuisine: American
Description
A crunchy and flavorful Blooming Onion deep-fried to golden perfection, featuring a well-seasoned flour coating and served with an optional dipping sauce. Perfect as an appetizer or a crowd-pleasing snack.
Ingredients
Oil for Frying
- 4 quarts high-heat oil (canola, corn, or peanut)
Onion and Breading
- 1 large sweet onion (13 to 14 ounces), such as Vidalia
- 1 cup all-purpose flour
- 1 tablespoon paprika
- 3 teaspoons kosher salt, divided
- 1 teaspoon dried oregano
- 3/4 teaspoon cayenne pepper
- 3/4 teaspoon ground cumin
- 3/4 teaspoon garlic powder
- 1/2 teaspoon freshly ground black pepper
Wet Mixture
- 2 large eggs
- 1/2 cup buttermilk or whole or 2% milk
Optional
- Dipping sauce (optional)
Instructions
- Heat Oil: Heat 4 quarts of high-heat oil in a large stockpot over medium-high heat until it reaches 375ºF, ensuring plenty of room to prevent overflow.
- Prepare Breading Mix: In a large bowl, whisk together 1 cup flour, 1 tablespoon paprika, 2 1/2 teaspoons kosher salt, 3/4 teaspoon cayenne pepper, 1 teaspoon dried oregano, 3/4 teaspoon ground cumin, 3/4 teaspoon garlic powder, and 1/2 teaspoon black pepper. Remove about 3/4 cup of this mixture and set aside.
- Make Wet Mixture: In a medium bowl, whisk together 2 large eggs, 1/2 cup buttermilk or milk, and the remaining 1/4 teaspoon kosher salt.
- Cut Onion: Trim 1/2 to 3/4 inch off the stem end of the onion and peel the outer skin. Place root side up on a cutting board. Make 4 cuts down to the board evenly spaced around the onion, avoiding the root, then make 4 cuts in between those to total 8 sections. Then make 8 additional cuts between these to total 16 sections, keeping the root intact.
- Spread Onion: Flip the onion over, gently spread petals to open like a flower, using a knife tip to release any stuck center pieces to avoid raw onion inside.
- First Flour Coat: Place cut side up into the flour mixture. Sprinkle the reserved flour over the onion, spreading petals so flour coats all nooks. Dust off excess flour.
- Dip in Wet Mixture: Transfer the onion cut side down into the egg mixture, lifting petals to coat thoroughly. Let excess mixture drip off.
- Second Flour Coat: Transfer onion cut side up back to the flour mixture, spread petals, and sprinkle reserved flour by section to fully coat petals on all sides.
- Prepare for Frying: Line a baking sheet with a wire rack and paper towels to drain the fried onion.
- Fry Onion: Carefully lower the breaded onion, cut side up, into the hot oil. Maintain oil temperature between 360 to 365ºF. Fry bottom cut side until deep golden, about 4 minutes. Flip and fry other sides an additional 3 to 4 minutes until golden brown and tender.
- Drain and Season: Remove onion with a spider or slotted spoon, drain excess oil by holding cut side down, then place cut side up on paper towels. Sprinkle with remaining 1/4 teaspoon kosher salt.
- Serve: Let cool about 5 minutes before serving, optionally with your favorite dipping sauce.
Notes
- Use a sharp chef’s knife to make clean cuts without ripping the onion petals.
- Make sure the oil is at proper temperature to prevent greasy or undercooked onion.
- Adjust seasoning in the flour mixture to taste for more or less spice.
- If buttermilk is unavailable, whole or 2% milk can be used as a substitute.
- Dipping sauce can be ranch, spicy mayo, or your preference for added flavor.
- Be cautious lowering the onion into hot oil as it will bubble up significantly.
- Ensure the root end remains intact for holding petals together during frying.
Nutrition
- Serving Size: 1 serving
- Calories: 450 kcal
- Sugar: 5 g
- Sodium: 700 mg
- Fat: 30 g
- Saturated Fat: 5 g
- Unsaturated Fat: 20 g
- Trans Fat: 0 g
- Carbohydrates: 38 g
- Fiber: 3 g
- Protein: 6 g
- Cholesterol: 90 mg


