

There’s something incredibly satisfying about biting into a rich, tender, and perfectly balanced chocolate cake. This Moist Chocolate Layer Cake Recipe is one of those gems that always impresses — whether for a birthday, special dinner, or a cozy weekend treat. I absolutely love how this recipe manages to stay delightfully moist without feeling heavy, and I know you’re going to enjoy it just as much as my family does.

Why You’ll Love This Recipe
- Perfect Moisture: The combination of buttermilk and coffee keeps the cake incredibly moist and full of rich flavor.
- Easy to Make: Simple mixing steps and common ingredients mean no specialty shopping or complicated techniques.
- Versatile Flavor: The subtle espresso powder elevates the chocolate without overwhelming, making it perfect for all chocolate lovers.
- Delicious Buttercream Frosting: Creamy, chocolatey, and not too sweet — it’s the ideal finishing touch every time.
Ingredients You’ll Need
All these ingredients come together beautifully to create a moist texture and deep chocolate flavor. A few key tips on what to pick will help your cake turn out amazing.

- All-purpose flour: Spoon and level for accuracy; crucial for the right cake structure.
- Unsweetened natural cocoa powder: Use good-quality cocoa for the best chocolate taste.
- Granulated sugar: Sweetens and helps with the moist crumb.
- Baking soda and baking powder: Both needed for leavening; baking soda balances acidity.
- Salt: Enhances all the chocolate flavors.
- Espresso powder (optional): Adds a subtle depth without making the cake taste like coffee.
- Vegetable or canola oil: Keeps the cake moist and tender.
- Eggs: Provide structure and richness.
- Vanilla extract: Adds warmth and rounds out the flavors.
- Buttermilk: Reacts with baking soda for rise and tender crumb.
- Strong hot coffee: Intensifies the chocolate flavor and moistens the batter.
- Unsalted butter (for frosting): Room temperature butter makes smooth, creamy frosting.
- Confectioners’ sugar: Sweetens and thickens the frosting.
- Heavy cream: Controls frosting consistency and adds richness.
- Cocoa powder (for frosting): Use the same type as the cake for consistent flavor.
- Salt (for frosting): Balances sweetness and enhances chocolate depth.
- Vanilla extract (for frosting): Adds aroma and complexity.
- Semi-sweet chocolate chips (optional): Great for garnish and texture contrast.
Variations
I love making this Moist Chocolate Layer Cake Recipe my own by tweaking a few ingredients or adding different toppings. You can easily personalize it to suit your taste or dietary needs.
- Gluten-Free Version: I’ve swapped the all-purpose flour with a gluten-free 1:1 baking blend, and it holds up wonderfully without sacrificing texture.
- Dairy-Free Version: Replace buttermilk with a plant milk plus a splash of vinegar and use dairy-free butter in the frosting — I’ve tried coconut oil in the cake, and it works well too!
- Frosting Flavors: I sometimes add a hint of orange zest or a teaspoon of espresso powder into the frosting for a flavor twist my family adores.
- Layer Add-ins: Adding fresh raspberries between layers gives a lovely tart contrast — totally worth trying.
How to Make Moist Chocolate Layer Cake Recipe

Step 1: Prep Your Pans Like a Pro
Start by preheating your oven to 350°F (177°C). Grease two 9-inch cake pans thoroughly, then line them with parchment paper rounds — this little step ensures your layers come out cleanly without sticking. I learned this trick after way too many cakes got ruined by stubborn pans, and it really saves you heartache!
Step 2: Mix the Dry Ingredients Carefully
In a large bowl, whisk together the flour, cocoa powder, sugar, baking soda, baking powder, salt, and espresso powder if you’re using it. Getting these combined well now helps ensure even rising and a consistent chocolate flavor throughout the cake.
Step 3: Combine Wet Ingredients Smoothly
Using a mixer (or a vigorous whisk if you prefer), beat together the oil, eggs, and vanilla until well blended. Then add the buttermilk and mix just until combined — no need to overdo it here, or you’ll risk toughening the batter.
Step 4: Bring It All Together With Coffee
Pour the wet ingredients into the bowl with your dry mix, then add the hot coffee (or hot water if preferred) last. Use a whisk or mixer on low speed to combine just until smooth — the batter will be thin, and that’s exactly what we want for a moist crumb.
Step 5: Bake and Test for Doneness
Divide the batter evenly between your prepared pans and bake for approximately 23-26 minutes. Keep a close eye on them from 22 minutes onward — you’re looking for a toothpick inserted in the center to come out clean or with just a few crumbs attached. Don’t worry if the cakes sink slightly when cooled; this is normal and just part of what keeps them so moist.
Step 6: Cool and Get Ready to Frost
Place your cakes on a wire rack and let them cool completely in their pans. I always wait patiently here because frosting warm cake is a recipe for melting messes, trust me! Level the cakes if needed with a serrated knife—this gives you those professional, flat layers perfect for stacking.
Step 7: Whip Up That Dreamy Chocolate Buttercream
Beat softened butter until creamy, then gradually add confectioners’ sugar, cocoa powder, heavy cream, salt, and vanilla. Beat on low to mix, then high until fluffy. If your frosting is too thin, add a bit more sugar or cocoa; if it’s too thick, add a splash more cream. I usually add one extra tablespoon of cream—it makes spreading a breeze.
Step 8: Assemble, Frost, and Garnish
Place one cake layer on your serving plate, spread an even layer of frosting, then top with the second cake and cover the entire cake with the remaining frosting. I find using an offset spatula and a bench scraper helps get those smooth, neat sides. Sprinkle some semi-sweet chocolate chips on top for a pretty and tasty finish.
Step 9: Chill Before Slicing
Refrigerate your cake uncovered for 30-60 minutes so the frosting can set up nicely, making slicing clean and easy. You can serve it chilled or bring it to room temperature—it’s delicious either way, but I personally love it slightly chilled on a warm day.
Pro Tips for Making Moist Chocolate Layer Cake Recipe
- Use Room Temperature Ingredients: This helps them blend better, giving you a smoother batter and fluffier cake.
- Don’t Skip the Coffee: It’s the secret ingredient that amps up the chocolate flavor without tasting like coffee.
- Level Your Cakes: A flat surface prevents your cake from sliding around when you frost, making your layers look neat and professional.
- Watch Baking Time Closely: Overbaking dries out the cake, so start checking early — ovens can vary quite a bit!
How to Serve Moist Chocolate Layer Cake Recipe

Garnishes
I usually keep it classic with semi-sweet chocolate chips or a dusting of cocoa powder for a simple, elegant look. Sometimes, I like to add fresh raspberries or a sprinkle of toasted nuts to add some texture and a pop of color.
Side Dishes
Pair this cake with vanilla ice cream or a dollop of whipped cream to balance its rich chocolatey taste. Fresh berries or a light espresso also work beautifully alongside, creating a delightful dessert experience.
Creative Ways to Present
For celebrations, I love topping the cake with edible gold leaf or piping rosettes with the frosting around the edges. You could also create a drizzle effect with melted chocolate ganache or even layer some fresh fruit between the cake layers for a fancy touch.
Make Ahead and Storage
Storing Leftovers
I store leftover cake tightly covered in the refrigerator, ideally in a cake carrier to keep it fresh and protect it from fridge odors. This method keeps the cake moist and delicious for up to 5 days — although it rarely lasts that long in my house!
Freezing
I’ve successfully froze unfrosted cake layers wrapped tightly in plastic wrap and then foil. When I want to enjoy the cake later, I thaw the layers overnight in the fridge before frosting. You can also freeze the frosted cake, but I recommend airtight wrapping to prevent freezer burn.
Reheating
Leftover slices warm up beautifully at room temperature, but if you prefer warmed cake, I pop a slice in the microwave for 10-15 seconds—it revives the softness without drying it out. Just be careful not to overheat, or the frosting can melt.
FAQs
-
What makes this cake so moist?
The combination of buttermilk reacting with baking soda and the use of hot coffee helps keep the cake incredibly moist and enhances the chocolate flavor. Plus, oil (instead of butter) in the batter contributes to that tender texture you’ll love.
-
Can I make this cake without coffee?
Absolutely! The coffee amps up the chocolate richness, but if you prefer, you can substitute hot water or even warm milk. Your cake will still be moist and tasty.
-
How should I store leftover cake?
Keep leftovers tightly covered in the fridge, preferably in a cake carrier or airtight container. This preserves moisture and prevents the cake from absorbing other fridge smells for up to 5 days.
-
Can I freeze this cake?
Yes, the unfrosted layers freeze very well when wrapped securely. Thaw in the fridge before frosting and assembling. You can freeze frosted cake too but make sure it’s tightly wrapped to avoid freezer burn.
Final Thoughts
This Moist Chocolate Layer Cake Recipe has become my go-to when I want a reliably delicious chocolate cake that always yields rave reviews. It’s just the right balance of rich flavor and tender crumb that feels like a hug in dessert form. I hope you give it a try and enjoy each bite as much as my family and I do — trust me, once you nail this cake, it’ll be your favorite too!
Print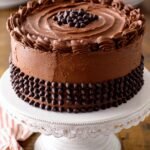
Moist Chocolate Layer Cake Recipe
- Prep Time: 30 minutes
- Cook Time: 26 minutes
- Total Time: 4 hours
- Yield: 12 servings 1x
- Category: Dessert
- Method: Baking
- Cuisine: American
Description
This Deliciously Moist Chocolate Layer Cake features rich cocoa, espresso-enhanced flavor, and a silky chocolate buttercream frosting. Perfect for any celebration, this cake is tender, flavorful, and beautifully layered with creamy frosting that is easy to make and sure to impress.
Ingredients
Cake:
- 1 and 3/4 cups (219g) all-purpose flour (spooned & leveled)
- 3/4 cup (62g) unsweetened natural cocoa powder
- 1 and 3/4 cups (350g) granulated sugar
- 2 teaspoons baking soda
- 1 teaspoon baking powder
- 1 teaspoon salt
- 2 teaspoons espresso powder (optional)
- 1/2 cup (120ml) vegetable oil (or canola oil or melted coconut oil)
- 2 large eggs, at room temperature
- 2 teaspoons pure vanilla extract
- 1 cup (240ml) buttermilk, at room temperature
- 1 cup (240ml) freshly brewed strong hot coffee (regular or decaf)
Chocolate Buttercream:
- 1 and 1/4 cups (282g) unsalted butter, softened to room temperature
- 3 and 1/2 cups (420g) confectioners’ sugar
- 3/4 cup (62g) unsweetened cocoa powder (natural or dutch process)
- 3–5 Tablespoons (45-75ml) heavy cream (or half-and-half or milk), at room temperature
- 1/4 teaspoon salt
- 1 teaspoon pure vanilla extract
- Optional for decoration: semi-sweet chocolate chips
Instructions
- Preheat Oven: Preheat your oven to 350°F (177°C). Grease two 9-inch cake pans and line them with parchment paper rounds. Grease the parchment paper to ensure the cakes release easily.
- Mix Dry Ingredients: In a large bowl, whisk together the all-purpose flour, cocoa powder, granulated sugar, baking soda, baking powder, salt, and espresso powder if using. Set aside.
- Combine Wet Ingredients: Using a handheld or stand mixer fitted with a whisk attachment, mix the vegetable oil, eggs, and vanilla extract on medium-high speed until combined. Add the buttermilk and mix again until incorporated.
- Make Batter: Pour the wet ingredients into the dry ingredients. Add the freshly brewed hot coffee and whisk or beat on low speed until the batter is completely combined. The batter will be thin.
- Bake Cakes: Divide the batter evenly between the prepared pans. Bake for 26 minutes or until a toothpick inserted in the center comes out clean. Remove from oven and allow cakes to cool completely in the pans on a wire rack.
- Prepare Buttercream: Beat the softened butter on medium speed with a mixer until creamy, about 2 minutes. Add the confectioners’ sugar, cocoa powder, 3 tablespoons of heavy cream, salt, and vanilla extract. Beat on low speed for 30 seconds, then increase to high and beat for 1 full minute. Adjust consistency by adding more cream if too thick or more sugar/cocoa powder if too thin.
- Level Cakes: If the cooled cakes have domed tops, use a serrated knife to slice a thin layer off to create flat surfaces for stacking. Discard the trimmed pieces or crumble over the finished cake.
- Assemble Cake: Place one cake layer on a serving plate. Spread an even layer of buttercream over the top. Place the second cake layer on top and cover the entire cake with the remaining frosting. Use an icing spatula and bench scraper for smooth edges. Garnish with semi-sweet chocolate chips, if desired.
- Chill Cake: Refrigerate the assembled cake uncovered for 30 to 60 minutes to set the frosting. The cake can be served chilled or at room temperature after chilling.
- Store Cake: Cover leftover cake tightly and store in the refrigerator for up to 5 days. A cake carrier is ideal for storing and transporting.
Notes
- Using parchment paper rounds helps to release the cake easily from pans without sticking.
- Espresso powder enhances the chocolate flavor but is optional.
- Use room temperature eggs and buttermilk for better batter consistency.
- Adjust buttercream texture by adding more cream or powdered sugar as needed.
- Leveling cakes ensures even stacking and a professional finish.
- Let the cake chill to set the frosting before slicing for clean slices.
- This recipe is perfect for handheld or stand mixers.
- The recipe is adapted from Ina Garten and originally from Hershey’s.
Nutrition
- Serving Size: 1 slice
- Calories: 450 kcal
- Sugar: 38 g
- Sodium: 220 mg
- Fat: 24 g
- Saturated Fat: 14 g
- Unsaturated Fat: 8 g
- Trans Fat: 0 g
- Carbohydrates: 55 g
- Fiber: 4 g
- Protein: 5 g
- Cholesterol: 65 mg


