

Imagine biting into a warm chocolate cake with a molten peanut butter center that oozes out like a little treasure—this Peanut Butter Chocolate Lava Cakes Recipe delivers exactly that magic. It’s the perfect blend of rich chocolate and creamy peanut butter, creating a dessert that’ll impress anyone you share it with.

Why You’ll Love This Recipe
- Decadently Gooey Center: The lava cake’s molten peanut butter core is pure bliss that melts in your mouth.
- Simple Ingredients: You only need a handful of pantry staples, many of which you probably already have.
- Quick to Prepare: From start to finish, these come together in under 35 minutes for a fast, impressive treat.
- Perfect for Impressing Guests: Serve it up fresh and watch the oohs and aahs roll in.
Ingredients You’ll Need
These ingredients play off each other beautifully—the bittersweet chocolate balances the salty creaminess of the peanut butter, while just a touch of flour and sugar creates the perfect soft cake shell with that signature molten center.

- Semi-sweet Chocolate: Use good quality bars like Ghirardelli or Lindt for the best melting and deep flavor.
- Unsalted Butter: Adds richness, and controlling the salt lets you balance flavors precisely.
- All-purpose Flour: Provides just enough structure without making the cake dense.
- Confectioners’ Sugar: Gives sweetness that dissolves smoothly—don’t swap it for granulated.
- Salt: Enhances the chocolate and peanut butter flavors—tiny pinch is enough.
- Eggs and Egg Yolks: Key to the luxurious texture and rise.
- Creamy Peanut Butter: Go for commercial creamy peanut butter like Jif or Skippy; natural or crunchy won’t work as well here.
- Optional Toppings: Ice cream, melted peanut butter, or chocolate syrup take this to the next level.
Variations
I like to think of this Peanut Butter Chocolate Lava Cakes Recipe as a versatile dessert canvas—you can easily tweak it to suit your cravings or dietary needs and still end up with a gorgeous molten centerpiece.
- Plain Chocolate Lava Cakes: Once I made these without the peanut butter as a test, and they turned out just as luscious—simply skip the peanut butter and bake the same way.
- Nut Butter Swap: I’ve tried almond butter before, but honestly, the flavor and texture just aren’t the same; peanut butter’s creaminess is unbeatable here.
- Gluten-Free Version: Substitute the flour with a gluten-free blend; just be sure it’s light and finely ground to keep that tender crumb.
- Peanut Butter Cups Addition: For an extra fun twist, try dropping a mini peanut butter cup in the center instead of spooning on peanut butter.
How to Make Peanut Butter Chocolate Lava Cakes Recipe
Step 1: Prep Your Ramekins and Oven
Start by spraying four 6-ounce ramekins with nonstick spray and dust them lightly with cocoa powder. This simple trick ensures the cakes slip right out when you’re ready to serve—trust me, it’s a game changer. Then preheat your oven to a piping hot 425°F (218°C), which helps create that firm edge and molten center.
Step 2: Melt the Chocolate and Butter
Chop your chocolate into coarse chunks. Pop the butter in a heat-proof bowl, add the chopped chocolate on top, and microwave in 10-second bursts, stirring well between each. This gentle melting avoids burning and gives you a silky smooth base. Set this luscious mix aside to cool slightly while you prep the dry and wet ingredients.
Step 3: Mix Dry and Wet Ingredients Separately
Whisk together the flour, sugar, and salt in one bowl. In another, beat the eggs and extra yolks just until combined—no overmixing needed. Combine the flour mixture and eggs with the chocolate-butter mixture by folding gently with a spatula or wooden spoon, breaking up any lumps for a smooth batter that’s a bit thick but totally scoopable.
Step 4: Assemble and Add Peanut Butter
Spoon the batter evenly into your prepared ramekins. Now here’s the star move: dollop about two teaspoons of creamy peanut butter on top of each and gently press it slightly into the batter. Don’t worry if some peanut butter peeks out—it’ll melt down beautifully during baking.
Step 5: Bake and Serve
Place the ramekins on a baking sheet and bake for 12 to 13 minutes. You want the edges to be set and firm while the centers look soft and a little jiggly. Let them cool for a minute, then carefully invert each ramekin onto a plate—oven mitts are a must here, those tins get seriously hot! The cakes should slide out easily, revealing that molten peanut butter lava within. Top it with your favorite ice cream and a drizzle of melted peanut butter or chocolate syrup if you’re feeling fancy. Serve immediately for the best gooey experience.
Pro Tips for Making Peanut Butter Chocolate Lava Cakes Recipe
- Use Quality Chocolate: I always use high-quality semi-sweet chocolate because it melts smoothly and has a rich flavor that makes all the difference.
- Don’t Overbake: I learned the hard way that even a minute or two more makes the center less molten, so keep a close eye and test at 12 minutes.
- Room Temperature Ingredients: Make sure eggs are room temp for easier mixing and smoother batter.
- Press Peanut Butter Gently: Pressing it too deep into the batter will make the center too loose, so just a light press is perfect.
How to Serve Peanut Butter Chocolate Lava Cakes Recipe
Garnishes
I love serving these lava cakes with a scoop of vanilla ice cream—the cold creaminess contrasts the warm cakes perfectly. A drizzle of melted peanut butter or chocolate syrup adds extra flair and flavor, and a sprinkle of flaky sea salt balances the sweetness beautifully. If you’re feeling extra festive, a few chopped roasted peanuts on top add a nice crunch.
Side Dishes
Since these cakes are quite rich and indulgent, I usually keep sides simple—a fresh berry salad or some lightly sweetened whipped cream complements the dessert without overpowering it. A strong cup of espresso or black coffee also pairs beautifully if you want a drink alongside.
Creative Ways to Present
For special occasions, I like to serve each cake on a small dessert plate with a dusting of cocoa powder or powdered sugar. You can add a fresh mint leaf or edible flower for a pop of color. Another fun idea is serving them in mini cast iron skillets for rustic charm, or topping with crushed pretzels for a salty crunch surprise.
Make Ahead and Storage
Storing Leftovers
I usually don’t have leftovers because these lava cakes disappear fast in my house, but if you do, cover them tightly with plastic wrap and refrigerate for up to 2 days. The molten center will firm up, but it’s still delicious when warmed back up gently.
Freezing
I tried freezing the prepared batter once and found it freezes well if you spoon it into ramekins and cover tightly with foil. When ready to bake, just thaw overnight in the fridge; you might need to add a couple extra minutes to bake time.
Reheating
To bring leftovers back to life, I reheat cakes in the microwave for 20-30 seconds, checking frequently to avoid overheating. This keeps the gooey center soft without drying out the cake edges.
FAQs
-
Can I make the Peanut Butter Chocolate Lava Cakes Recipe dairy-free?
Yes! You can substitute butter with a dairy-free margarine or coconut oil and pick dairy-free chocolate bars. Make sure your peanut butter is also dairy-free (most commercial brands are). Keep in mind the texture might vary slightly but still delightful.
-
What’s the best type of peanut butter to use?
Go for creamy, commercial peanut butter like Jif or Skippy. Natural or crunchy peanut butters have oils that separate and different textures, which can affect the lava cake’s consistency.
-
How do I know when the lava cakes are done baking?
Look for firm and set edges around the cake, but the center should still look slightly soft and jiggly—not liquid but not fully set either. Overbaking will cook out the molten center.
-
Can I use a muffin pan instead of ramekins?
Definitely! Grease six muffin cups well and dust with cocoa powder. Bake at 425°F (218°C) for 8-10 minutes. The cakes will be smaller, but just as yummy. Use a spoon to release them and invert onto plates.
-
Can I prepare the batter ahead of time?
Yes! Prepare the batter through step 4, cover it tightly, and keep it refrigerated for up to one day. Let it come to room temperature before baking to get the best rise and texture.
Final Thoughts
This Peanut Butter Chocolate Lava Cakes Recipe is one of those desserts that feels fancy but is surprisingly easy to pull off, even if you’re not a baking pro. I’ve made it countless times for family dinners and special occasions, and it never fails to impress and disappear quickly. Give it a try—you might just find your new favorite indulgence that’s perfect for cozy evenings in or wow-worthy celebrations.
Print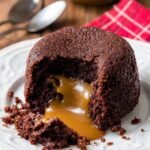
Peanut Butter Chocolate Lava Cakes Recipe
- Prep Time: 15 minutes
- Cook Time: 13 minutes
- Total Time: 35 minutes
- Yield: 4 cakes 1x
- Category: Dessert
- Method: Baking
- Cuisine: American
- Diet: Vegetarian
Description
Decadent Peanut Butter Chocolate Lava Cakes featuring a molten chocolate center with a creamy peanut butter surprise, baked to perfection for an indulgent dessert experience.
Ingredients
Chocolate Batter
- 6 ounces semi-sweet chocolate
- 1/2 cup unsalted butter
- 1/4 cup all-purpose flour
- 1/2 cup confectioners’ sugar
- 1/8 teaspoon salt
- 2 large eggs
- 2 large egg yolks
Filling and Garnish
- 8 teaspoons creamy peanut butter
- Ice cream (optional for serving)
- Melted peanut butter (optional for drizzling)
- Chocolate syrup (optional for drizzling)
Instructions
- Prepare ramekins: Spray 4 6-ounce ramekins with nonstick cooking spray and dust with cocoa powder to ensure cakes release easily after baking.
- Preheat oven: Set the oven temperature to 425°F (218°C) for proper baking level.
- Melt chocolate and butter: Coarsely chop chocolate and place with butter in a heat-proof bowl. Microwave in 10-second increments, stirring until completely smooth. Set aside.
- Mix dry and wet ingredients: Whisk flour, confectioners’ sugar, and salt in a small bowl. In another bowl, whisk together eggs and egg yolks.
- Combine batter: Gradually add flour mixture and eggs to melted chocolate, stirring gently with a spatula or wooden spoon. Use a whisk to remove lumps, resulting in a slightly thick batter.
- Fill ramekins and add peanut butter: Spoon batter evenly into ramekins. Top each with 2 teaspoons of creamy peanut butter, pressing lightly into the batter.
- Bake: Place ramekins on a baking sheet and bake for 13 minutes until sides are firm but tops remain slightly soft.
- Cool and invert: Let cool for 1 minute, then carefully invert each ramekin onto a plate using oven mitts so cakes release cleanly.
- Serve: Add ice cream and drizzle with melted peanut butter or chocolate syrup if desired, and serve immediately for best taste.
Notes
- The batter can be prepared up to step 4 and refrigerated for up to 1 day; bring to room temperature before baking.
- Use commercial creamy peanut butter such as Jif or Skippy; avoid natural, crunchy, or other nut butters.
- For plain lava cakes without peanut butter, omit peanut butter and bake for 13 minutes.
- Use 6-ounce ramekins for best results; larger sizes may alter baking time.
- If no ramekins, use a greased and cocoa-powder-dusted muffin pan for 6 smaller lava cakes, baking at 425°F for 10 minutes.
- Nonstick spray and cocoa powder help prevent sticking and ensure neat cake release.
Nutrition
- Serving Size: 1 cake
- Calories: 420 kcal
- Sugar: 30 g
- Sodium: 150 mg
- Fat: 28 g
- Saturated Fat: 12 g
- Unsaturated Fat: 14 g
- Trans Fat: 0 g
- Carbohydrates: 38 g
- Fiber: 3 g
- Protein: 7 g
- Cholesterol: 140 mg


